My Account
 What Are the Steps for WordPress Admin Login?
Starting a new WordPress site is surely a compelling experience; however, it requires a few essential steps. The initial step involves installing WordPress on your designated domain. The main things you should consider during this process are identifying the WordPress admin login URL and understanding the procedure for accessing the WordPress admin area. Logging into the WordPress admin page is usually a simple task, especially when you know how to login WordPress admin page.
If this is your first time with the WordPress login area, do not worry. This post shows you a detailed guide for the WordPress admin page login. But before moving on to that, let’s take a brief overview of what a WordPress login page is and why it is important.
What is a WordPress Login Page
The WP login page is the interface where you can access the admin dashboard of a WordPress site by entering your credentials. You can access it through a specific WordPress admin login URL. Usually, this URL is as follows-
siteurl/wp-login.php or siteurl/wp-admin.
It is the most common way to access your WP login page. But sometimes, this URL may be customized. While the default login URLs are common, you can customize them for added security. Also, customized URLs make it easier to find and access.
Why is the WordPress Login Page Important
The WP login page is an important security checkpoint. It controls access to the admin functions of your site and also serves as the gateway to managing and customizing your site. It is the first point of interaction for users accessing the admin area. Thus, its security and user experience are important. Securing this page is crucial to prevent unauthorized access and potential data loss and stolen. Many users prefer WordPress Single Sign-On these days for more customized site security.
Also, a less secure login page can be used through many brute-force attacks or login attempts by hackers. This gives them full access to your site, allowing these hackers to modify your site content, steal data, or even crash your site. The default WP login URL is the main target for hackers. So, you can secure it by changing or customizing the default URL.
Besides security, the login page is important for user experience and brand identity. It can reinforce your brand identity and set the tone of your site to create a more cohesive experience.
Steps for WordPress Admin Login
Step 1. Open Your Web Browser
In the first step, run your internet browser to log in to the admin page of WordPress. Use a web browser that you feel more comfortable and secure with. Most people prefer Google Chrome, IE, and Brave browsers, but you can go with any.
Step 2. Visit the Login Page
In the address bar, type your site’s address followed by /wp-admin or /wp-login.php. These are the widely used admin login URLs.
For example, if your site is xyz.com, you would enter xyz.com/wp-admin or xyz.com/wp-login.php. If your WordPress installation is in a subdirectory, you will need to include that in the URL as shown below-
xyz.com/subdirectory/wp-admin.
Once you run the login URL, WordPress will show you a login screen prompt just like the one in the image below-
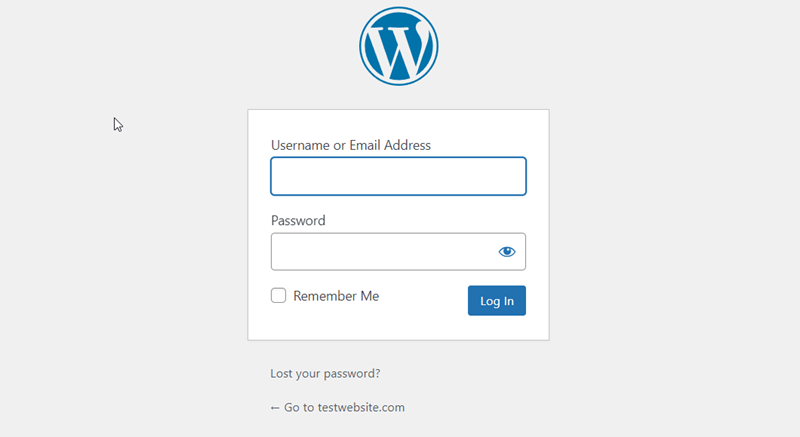
Step 3. Enter Your Login Details
As you can see in the image, the login screen prompt contains two fields. These fields request you to enter your login details. This usually includes a password and email address, or a username that you added during the WP installation. Type the requested details in the fields and tap the “Log In” button. Now, you can access the admin dashboard.
Note: Many users do not save their login details and forgot WordPress admin password. They can retrieve them using the ‘Lost your password?’ link on the page. They can use this link or access your database through phpMyAdmin to reset the password from there.
Bonus Step: For easy management of passwords or login details, you can use the ‘Remember Me’ box. It is a valuable feature that lets you stay logged in for several sessions based on your browser cookie settings.
Step 4. Accessing the WordPress Dashboard
Upon logging in, it will direct you to the WordPress admin dashboard. It is the central hub that allows you to manage your site, create posts, change themes, and much more.
Troubleshooting Login Issues
Sometimes, users see common login issues such as URL problems, incorrect passwords, or username errors while logging into the WordPress admin page. In these scenarios, you can try basic troubleshooting as mentioned below from your end.
If the Login URL is Not Working
First, ensure that you have typed the correct URL in the search box. If you have installed WordPress in a subdirectory, you must include the subdirectory path in the URL.
Incorrect Login Details
Sometimes, we accidentally enter incorrect details. Thus, always double-check your login details. If you have typed the correct credentials and still can not log in, try clearing your browser’s cache or using a different browser.
Database Connection Problems
If your database connection is broken, you can check your database details in the wp-config.php file and verify the connection through your hosting account.
.htaccess Issues
A corrupted .htaccess file can prevent you from logging into your accounts. You can try resetting the .htaccess file to the default settings. You can reset the file through the file manager of your hosting account.
If You Forgot Your Password
As we mentioned earlier, you can retrieve or change your password from the ‘Lost your password?’ link on the login page. When you tap this link, you will be asked for your email address or user ID to reset the password via a link.
Conclusion:
WordPress automatically adds a login page for your site when you install it. This login page lets you access the WordPress dashboard via an admin login in WordPress. This dashboard is very useful as it allows you to make any changes to your site. Therefore, you should be familiar with the admin login for WordPress to effectively manage these changes. You can find the login link, access the admin page of WordPress, and remain logged in as long as you want by following the mentioned steps.