My Account
 Haiper AI: Try AI Video Generator For Free
As a passionate tech lover and content creator, I like to get my hands on various new AI tools and test them out. For the last few weeks, I have been constantly looking and trying various generative AI tools, and I have shared my experiences with these tools in previous posts as well. Today, we will continue our journey and review another great generative AI tool, Haiper AI.
It is a popular and powerful AI video generation tool with many smart features. We will introduce you to this tool and its features, so keep reading-
What is Haiper AI?
Haiper is a quick, responsive generative AI platform that offers various AI tools for image, video, and other content creation. Its AI algorithms let users unleash their wildest creativity and generate desired content for their project or need.
The platform also uses a community-driven approach to inspire creators to create, recreate, and experiment with content, and provide feedback to shape and improve the current design models.
Besides this, Haiper AI’s interactive and responsible models deliver users enjoyable and relatable content that they can share across various social channels.
Haiper AI: Core Features
Text to Image
It is one of the basic yet appealing features of the Haiper platform. Like many other popular generative AI tools, such as Hailuo AI, it also lets you create images with text prompts, turning words into pictures and scenarios.
Text-to-Video
It serves as a cornerstone feature for Haiper AI. It offers powerful text-to-video capabilities. Just add your input (description of the video you want to create) in the prompt and witness how the AI would interpret and visualize your ideas into an engaging video. Although results aren’t always perfect, you will find the process straightforward, and eventually, the platform gives you the desired output in a few tries.
Image-to-Video
It is another engaging feature that the platform offers. It allows users to generate AI video shorts and animated sequences using static images. The platform interprets the uploaded image and expertly animates various types of videos. Haiper AI also gives users the freedom to experiment with image variations such as landscapes, portraits, and even abstract art, providing versatility and limitless creation possibilities.
Key Frame Conditioning
The platform also organizes and positions your selected images strategically to function as the key frames for the video you want to generate. It chose each key frame thoughtfully to convey the intended narrative and visual flow of the project effectively. This way, Haiper AI ensures a cohesive and engaging viewer experience.
Video-to-Video or Video Repainting
The video repainting is a unique feature of Haiper AI that lets you add AI-generated modifications to uploaded videos. You can customize the visual style, change the color palette, or even add new elements to the background to make your original video unique and stand out. This way, you can give new life to old videos, save time, and resources.
Getting Started with Haiper AI
Getting started with Haiper AI is so easy and fun, as the platform is constantly trying to make the AI video experience as straightforward and enjoyable as possible. Here is a tutorial on how you can use Haiper AI for video generation using its web interface.
Let’s Generate Your First AI Video
Let’s start by visiting its primary platform, Haiper Web App for creating videos. Once you reach its web platform, select “Creations” from the explore page to get started. Now type the brief description about the video you want to create into the prompt window at the bottom of the screen. For instance, if you want to create a dog-related type dog with white fur and blue eyes in the prompt, and press “Create” to start the creation process.
You can try out different prompts with different colours and animals, or you can also describe unreal and imaginative things, like a glass dragon breathing fire. This will give you your desired AI video output.
The process isn’t finished here; you can delve into its different settings and creation modes to make your AI video even more fascinating and unique.
The Interface
On the left side of the Haiper platform, you will find the navigation menu. From this section, you can access your favorites, the spotlight submission, profile, and links to various social channels, such as X, FB, Discord, and other resources. On the right side, you can see the results section, where all generated results are presented in a thumbnail format. You can scroll through your creation history and click on any result to access the respective generated video.
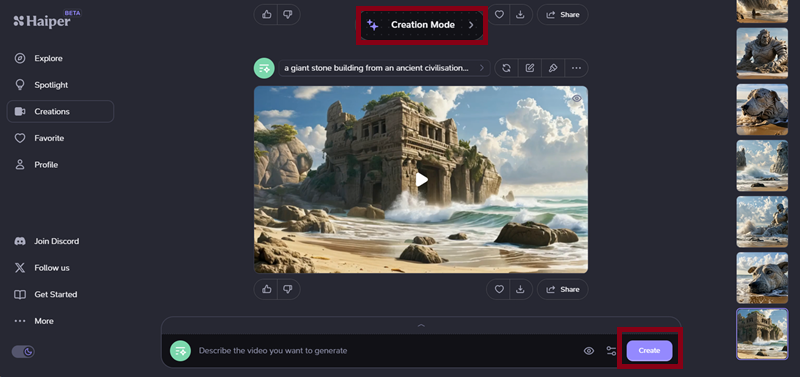
You can see your current video project on the front and centre, along with various options above and below, as shown in the image. These options include:
- The prompt window (at the bottom of the page) is where you will add a video description to make your videos.
- Video info “>” on the right side of the dialog box.
- Regenerate videos with the same image, but with other motion.
- Regenerate video with a different prompt.
- Edit part of the video through the repaint function.
- Delete and edit the view permissions for the video.
- Like/Dislike vote for the video.
- Add the video to the “Favourite” collection.
- Download option for the video
- Share video option.
Settings
By default, settings for video generation are configured to create two-second videos with an aspect ratio of 16:9. However, you can modify these settings; you can select the two horizontal lines located near the create button. The settings window presents several options that vary based on the creation “mode” selected. Here we only see settings for text-to-video mode, and they are as follows:
Seed: The seed controls the level of randomness in the generated output. By locking the seed to a specific value, you can ensure repeatability to reproduce the particular results.
Duration: This option lets you determine the length of the video to be generated. Currently, the platform supports video generation durations of 2 and 4 seconds.
Aspect Ratio: This setting specifies the width and height of the generated video. Haiper AI provides several popular aspect ratios for text-to-video, including 9:16 and 21:9, which offer an ultra-wide cinematic appearance.
Near the settings options, you can see the privacy configuration, symbolized by an eye icon. Here, you can set your generated content as either public or private. Private generations will remain visible solely to you, while public generations can be shared via a link and be featured on the explore page.
Creation Modes
When you tap on the creation mode, you will find that Text-to-Video is not the only way to create; there are also Image-to-Video and Video-to-Video options available. From “Creation Mode,” you can easily switch between these modes.
- Text to Video – You can create a video with text; just describe the video you can imagine in the text prompt.
- Animate Your Image (Image to Video) – Add your image, and Haiper AI brings it to life.
- Repaint Your Video (Video to Video) – Change the style, color, or subject in your video with text prompts.
- Extend Video – Add a video, describe what you would like to happen next in the prompt, and the platform will generate and add the desired changes to your video.
Haiper AI: Applications and Use Cases
The Haiper platform offers many unique tools and features that make it a versatile solution for various individuals and professionals. Here are some of its use cases-
Bloggers: Bloggers can use this platform to create video overviews of blog posts and articles to boost engagement on various social platforms.
Event Planner: Haiper AI lets event planners build promotional video content for weddings, parties, and other upcoming events. They can use venue photos and event descriptions to generate content.
Social Media Manager: The platform allows social media managers to create engaging video content that they can publish on various social platforms.
Real Estate Brokers: With Haiper AI, they can develop property showcase videos from listing texts and photos to entice possible customers.
Graphic Designer: Graphic designers can use Haiper AI to improve static images and designs. It can convert these static designs into small, animated video clips for project presentations.
Digital Marketing Specialist: Digital marketers can develop short, eye-appealing video clips from text descriptions for ads and marketing campaigns.
E-learning and Academic Content Creator: They can turn educational text and images into vibrant video lessons with Haiper AI.
Pros and Cons of Haiper AI
Pros:
- Easy and Intuitive Dashboard
- Multifunctional Video Generation
- User Community
- Good Quality Output
- API availability
- Free to Try
Cons:
- Short Video Duration up to 6 seconds only.
- Limited video generations in the free plan.
- Often encounter technical issues with watermark removal.
Conclusion:
As we have seen, Haiper AI offers impressive features, a superficial UI, and customization capabilities that make it a perfect option for small business owners, graphic designers, marketers, and individuals who want an AI tool for content creation. I prefer premium generators for a smoother creation experience, as free ones have limitations in video generation, including length and number of generations. Since there are lots of generative AI tools available, Haiper AI remains a solid option for users thanks to its standout features, fast performance, and affordable pricing.
Also read: Takipcimx 1000: Boost Your Instagram Reach Effortlessly