My Account
 How To Troubleshoot Your WordPress Website?
Hello there. Today, in this beginner’s guide, we will show you step-by-step how to troubleshoot your WordPress website. So keep reading.
WordPress is an amazing platform to explore and turn your ideas into reality. However, you might get stuck somewhere due to unexpected issues on the site or some errors that have to be solved. It would be great if we had a magic wand to solve the issues. We all know that is not possible. It requires a lot of effort to find the type of error and resolve it.
Let us find out some proven strategies and steps to take when you are stuck on the WordPress website.
How To Troubleshoot Your WordPress Website?
1. Analyze Your Error Message
2. Create A Complete Backup of Your Website and Debug Your Website
3. Clear Your Cache
4. Deactivate Your Plugins
5. Check On The Themes
6. Refresh Your Website Permalinks
7. Usage of Site Health
8. How To Fix Email Problems
9. Check Reading Setting
10. Scanning for Malware and Backdoors
11. Asking for Help
12. Conclusion
1. Analyze Your Error Message:
WordPress errors come in a variety of forms and sizes, such as the maintenance mode bug or the connection timed-out warning. There are three common WordPress errors:
Error 404 or Page Not Found:
Four hundred four errors are the most common and simplest resolved of the bunch. There are several reasons why they can appear, including broken links or errors in the address, when someone searches for a URL that is not there on your website. It only takes a few seconds to find and replace broken links. But you must first look for them and take into account the security risks this poses to both you and your site’s visitors.
The White Screen of Death (WSoD):
You’ve been hit if your website suddenly starts to show a white screen. Issues with auto upgrades, maintenance mode faults, or plugin and theme compatibility frequently bring on the WSoD. Troubleshooting becomes a nightmare with all these possible causes, specifically when you do not indicate the cause.
Internal Server Errors:
Internal server problems are identifiable since they are always accompanied by a large internal server error message.
The real issue arises during the debugging process because a wide range of causes might result in internal server issues.
You can find detailed information on the most common WordPress errors and how to fix them.
2. Create A Complete Backup of Your Website and Debug Your Website:
Backup:
A complete backup of your website should be done. When something goes wrong, the WordPress backup allows you to restore your site. This would be the best thing to do in case of any security attacks or loss of data.
If you are using a backup plugin, make sure to update them regularly. We advise making multiple copies of your WordPress backups and storing them in cloud storage services like Google Drive or Dropbox because backups are so important.
You can save your files in multiple locations with several WordPress backup plugins. For instance, Updraft Plus offers a variety of online storage options.
If you do not currently use a backup plugin, you should do so right away. You can manually back up your database and files if you don’t currently have access to WordPress.
Debug:
Another crucial thing is to debug your site – to detect and fix errors. WordPress makes it simple and easy to do because it has specific debug systems.
To do so, navigate to your WordPress directory and enter the wp-config.php folder. Next, find and update the wp debug constant from “false” to “true” so that the admin can observe the faults discovered throughout this process. Don’t forget to complete this step; WordPress’s default setting for this constant is “false.” It should be noted that utilizing WP debug is advised only for local testing and staging installations; live websites should not use it.

When this option is enabled, all PHP errors, warnings, and alerts are displayed. Once the problems are discovered, they are simple to resolve.
Then, alter the value of the wp debug log to “yes” in the content directory (often wp-content/debug.log) to save the errors in a debug.log log file. This is a good choice because you may see and review the notices at a later point.
3. Clear Your Cache:
Brower Cache:
Many times, your browser will not recognize that a WordPress page or post has changed and will instead load an outdated page from the browser cache. You will thus view an earlier version of your website or post.
If you are seeing out-of-date content, you may need to delete your browser cache. This procedure will differ based on your web browser. For more details, check How to clear WordPress Cache?
Plugin Cache:
Users must download your web pages to use your site each time they come. However, this procedure can occasionally take a long time and slow down page loading.
What does a plugin for caching do? By gathering data and reducing the number of steps required to reach the target, a caching plugin speeds up the creation of websites. As a result, the plugin loads a page that is noticeably lighter than the heavier one each time a user attempts to access your website. Because a Cache Plugin gives your WordPress good speed and performance, using one is crucial.
To locate the problem during troubleshooting, you should always clear the cache for plugins after deactivating them. Why? Because WordPress may still have its data preserved even if all of your plugins are deactivated.
DB Cache:
Database caching expands your main database by reducing unnecessary strain. Usually, this happens through regularly read data. It stores database results so that they can return more quickly the following time.
You should clear your database cache while debugging, as this enables you to determine the source of the error.
4. Deactivate Your Plugins:
The majority of errors occur as a result of conflicts between distinct plugins. The best way to detect the issue is to deactivate each installed plugin on your website one at a time. After uninstalling each plugin, make sure to clear the cache because it can still be stored in your browser’s data.
The process to deactivate is as follows: Plugins> /select the plugin by ticking it/> Deactivate.

Finding out which plugin was the issue is frequently done in this way. Deactivate each one separately to determine the cause.
Additionally, you can deactivate in phpMyAdmin. Then, navigate to the wp prefix table and look for active plugins. You can now deactivate them.
5. Check On The Themes:
If you’ve deactivated all of your plugins and the error persists, it’s time to look into the themes. By simply changing the active theme to one of the WordPress basic themes, you can determine whether or not your theme is having issues. When you initially install WordPress, the theme that appears is known as the default theme. Normally, you can alter this in your wp-admin dashboard.
To do this, navigate to Appearance> Themes and select your favorite default theme by clicking the Activate button.

In any case, you can change the theme from your database if you cannot log in and are seeing a white screen. Open the database first. Then, you can visualize a menu on the left side of the screen, where you need to click wp options> /find the rows “template” and “stylesheet” (Usually they are on the 2nd page)/. Next, substitute a default theme for each option value. To save the changes, don’t forget to click enter.
If the “theme’s fault” was the cause of your issue, it has now been resolved.
6. Refresh Your Website Permalinks:
Since WordPress uses permalinks and URL structures that are helpful to search engine optimization, the permalinks may only sometimes function as expected when you migrate material from one server to another. You may easily store the permalinks in your WP Settings to avoid this kind of problem. Go to Settings > Permalinks > Save Changes. Or, if you prefer, you can make your changes.

7. Usage of Site Health:
WordPress includes a fantastic function called Site Health. You can use it to view and manage the “well-being” of your website. In your admin dashboard menu, select Tools> Site Health to find it.

This tool has a plugin called Health Check & Troubleshooting that you can utilize. This plugin allows themes and other plugins to add additional checks while also doing checks to identify common configuration issues. A clean WordPress session with all plugins disabled and the default theme is possible with the WordPress troubleshooting plugin.
8. How To Fix Email Problems?
Some WordPress hosting organizations’ mail settings might not be set up correctly. This will block WordPress from sending emails to you and your visitors.
You won’t receive an email when users fill out your form if you are using a contact form plugin. Additionally, you won’t receive any WordPress notifications, such as alerts about major security risks or ominous activities.
Using an SMTP service provider is the best approach to solve this issue. For more information, visit our tutorial on how to resolve the WordPress email-sending problem?
9. Check Reading Setting:
It should be easy for search engines like Google to find your website if you follow the WordPress SEO best practices.
However, a newly created WordPress website may not appear in search engine results. This can be the case because search engines need Help finding your website.
Go to Settings » Reading to review the settings for your website.
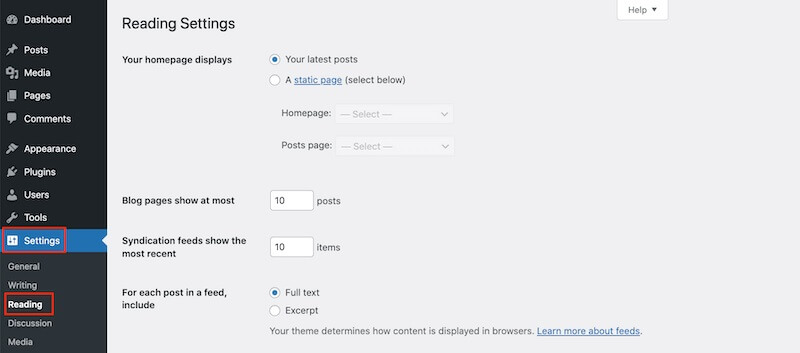
When you have finished, scroll to the bottom of the page and make sure the box for “Search Engine Visibility” is unchecked.
With this choice, search engines won’t index your website.
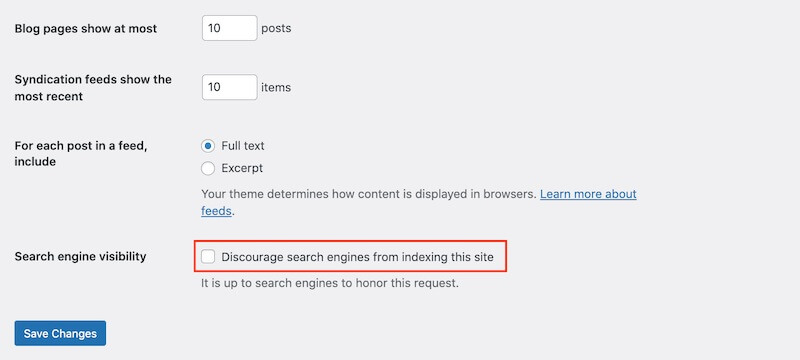
Website owners frequently use this setting when they are still working on their site and do not want their material to appear in search results.
However, you may have checked this setting by mistake and overlooked it.
If you want your site to show in search results, uncheck this option and then click ‘Save Changes.’
If you’re still working on your site, consider adding a page for coming soon. A stunning coming soon page will generate interest in your website and may even serve as a tool for generating leads.
10. Scanning for Malware and Backdoors:
If you suspect that your WordPress site is infected by malware, then you should scan your website with Imperva. It is one of the best website security monitoring services for WordPress owners.
11. Asking for Help:
You should ask their authors for assistance if, after doing these troubleshooting procedures, you determine that some of your plugins or your theme is to blame. In some situations, you might need to get in touch with your hosting company to make additional server configurations after getting in touch with the plugin or theme authors. If necessary, they can assist you with things like boosting server resources or even malware cleanup.
12. Conclusion: Troubleshoot Your WordPress Website
Learning the fundamentals of WordPress troubleshooting will not only help you fix mistakes but also help you understand the platform’s inner workings. This guarantees that, even if you encounter issues, you will be able to spot them and fix them.
The next time you encounter a confusing WordPress problem, keep these tips in mind:
- Before making any dramatic changes, back up your website.
- Investigate your error message.
- Disable your plugins and themes manually.
- Clear your cache, Scan for Malware and backdoors
- If none of the above works, try contacting a WordPress professional.