My Account
 How To Convert From Container To Column WordPress
Are you sick and weary of your WordPress website’s outdated appearance? Do you want to make an eye-catching, cutting-edge design that will stick in the minds of your visitors? You don’t need to search any further! In this in-depth tutorial, we will explore the fascinating realm of switching from a container-based style to a column-based layout in WordPress.
This detailed article will show you how to change the layout of your WordPress website from a container-based layout to a column-based one. Discover how to select the appropriate tools, include and arrange columns, and optimize your design for a visually appealing and interesting user experience. Use WordPress to transform your website and wow your visitors with a contemporary, dynamic column style.
Why Convert a WordPress Container to a Column
Website owners must stay current with design trends and offer a compelling customer experience. Although practical, the conventional container layout may seem a little dated and unappealing. Make the switch to a column-based layout to unleash even more creative and flexible design options.
A dynamic method of arranging and presenting your content is with columns. They let you design aesthetically beautiful portions with distinct content arranged side by side. Columns offer a visually appealing and well-organized framework for showcasing your portfolio, newest blog pieces, or product highlights.
You might be wondering how to bring about this change at this point. You need not worry; we have you covered! In this tutorial, we’ll take you step-by-step through the entire process so you can easily switch your website from a container layout to a column layout.
How to Change a WordPress Container to a Column
We will begin by looking at the many options and tools that WordPress offers for building layouts that are based on columns. We will assist you in selecting the appropriate solutions based on your demands and experience level, from well-liked website builders to theme alternatives. Additionally, we’ll offer suggestions for both premium and free solutions so you may select the one that best suits your spending limit.
To make this conversion, take the following actions:
Step 1: Select a Page Builder or Column-based Theme
You must use a WordPress theme or page builder that supports columns if you want to create a layout that is based on columns. Numerous choices offer column functionality—both premium and free. Among the well-liked options are:
- Elementor
- Divi
- Beaver Builder
- Visual Composer
Select a theme or page builder that complements your style and provides the customization options you require to make column layouts.
Step 2: Install and Turn on the Page Builder or Theme of Your Choice.
Install and activate the theme or page builder you’ve chosen for your WordPress website. If you’re using a page builder, installing a different plugin might be necessary. To guarantee correct installation, adhere to the guidelines supplied by the theme or page builder developer.
Step 3: Add a New Page or Modify an Already-Published One
Go to the page you wish to edit and change your layout to columns. Make a new page if you’re beginning from scratch. Find the page you wish to convert in your WordPress dashboard and select it by clicking the “Edit” button.
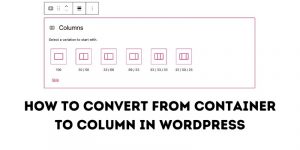
Step 4: Go to the Options for Column Layout
Accessing column layout choices can be different depending on the theme or page builder you are using. These features are typically found in the page editor or page builder interface. Seek for options or buttons that let you add more columns.
Step 5: Add and Set Up Columns
You can add and rearrange columns to suit your needs after you’ve got access to the column layout choices. Column elements may usually be dragged and dropped onto your page, with their width and positioning easily changed. You can select and alter pre-made column layouts from certain page builders.
Step 6: Edit Content in Columns
Now that your columns are set up, it’s time to add content to them. You can insert anything you want in each column, such as text, pictures, movies, and so on. Utilize the features and options of the page builder to personalize the material within each column separately.
Step 7: Preview and Publish
Once you have completed modifying the text and arrangement of your columns, take a moment to see your changes. Make sure your columns are displaying correctly and that everything looks as you want it to. Save your edits and publish the page once you’re happy.
Best wishes! Your WordPress website has been successfully changed from having a container layout to a column layout. Now, your website will have an eye-catching, contemporary look that is likely to draw in visitors.
To guarantee responsiveness and the best possible viewing experience, remember to test your website across a range of devices and screen sizes. By making the necessary changes, you can ensure that the layout and responsiveness are ideal for every user.
Conclusion
That’s it, dear! You now possess all the necessary data to change the container layout of your WordPress website to a column layout. You may make your website look better by implementing the instructions provided in this tutorial to create a more engaging and modern design.